


Introduction
Principles of navigation set a baseline for consistent and intuitive user experience in android apps. The principles include:
- Fixed start destination. This is the first screen when the user launches the app from the launcher. It is also the last screen when users return to the launcher after pressing the back button.
- Navigation state is presented as a stack of destinations
- Up and back are identical within the app stack.
- The up button never exits the app.
- Deep linking simulates manual navigation.
Android Jetpack includes Navigation components. Navigation components simplifies implementation of navigation in android app, from simple button click to more complex patterns such as navigation drawer. Navigation components ensure consistent and predictable user experience by adhering to the set principles.
Other benefits of implementing navigation components include:
- Handling fragment transactions.
- Handling up and back button actions correctly by default.
- Include navigation UI patterns such as bottom navigation and navigation drawer, with minimal additional work.
- Safe args: A gradle plugin that provide safety when passing data between destinations.
- ViewModel Support.
Note: Even if you are not using Navigation components in your project, the app should adhere to the principles of navigation.
In this series of articles we will be exploring Navigation components. In this article we will look at What are Navigation Components and Getting started with navigation components.
In the upcoming articles we will look at Navigation UI patterns, passing data between destination using safe args plugin and finally deep linking using navigation components.
What are Navigation Components?
Navigation components are a collection of libraries, a plugin, a tooling for unifying and simplifying android navigation.
Navigation components are comprised of three major parts:
- NavGraph. An XML resource that contains all navigation related information in one central location, i.e. destinations as well as paths that user can take within the app.
NavHost. An empty container where destinations are swapped in and out.
NavController. An object that manages app navigation within a navHost. Navigating to a destination is done using a NavController. Each NavHost has its own corresponding NavController.
Getting started with Navigation Components
To use Navigation components you need android studio 3.3 or higher
Set up your environment
- Add the following dependencies in your app's build.gradle file
dependencies {
  def nav_version = "2.1.0"

  // Java language implementation
  implementation "androidx.navigation:navigation-fragment:$nav_version"
  implementation "androidx.navigation:navigation-ui:$nav_version"

  // Kotlin
  implementation "androidx.navigation:navigation-fragment-ktx:$nav_version"
  implementation "androidx.navigation:navigation-ui-ktx:$nav_version"

}
Creating a navigation graph
To add a navigation graph in your project do the following:
- On the project window right click on the res folder. Select New > Android Resource file. The New resource file dialog file appears.
- Type in the File name field e.g. “nav_graph”
- Select Navigation from resource type drop-down list, then click OK as shown below.

After creating the first navigation graph, a navigation folder is created in the res folder. The navigation folder contains the newly created navigation graph, i.e. the nav_graph.xml file.
Navigation editor
Android studio opens the navigation graph in the navigation editor.
The navigation editor comprises of the following: Destinations panel, Graph editor, and attributes.
The newly created grap is empty, as shown below.
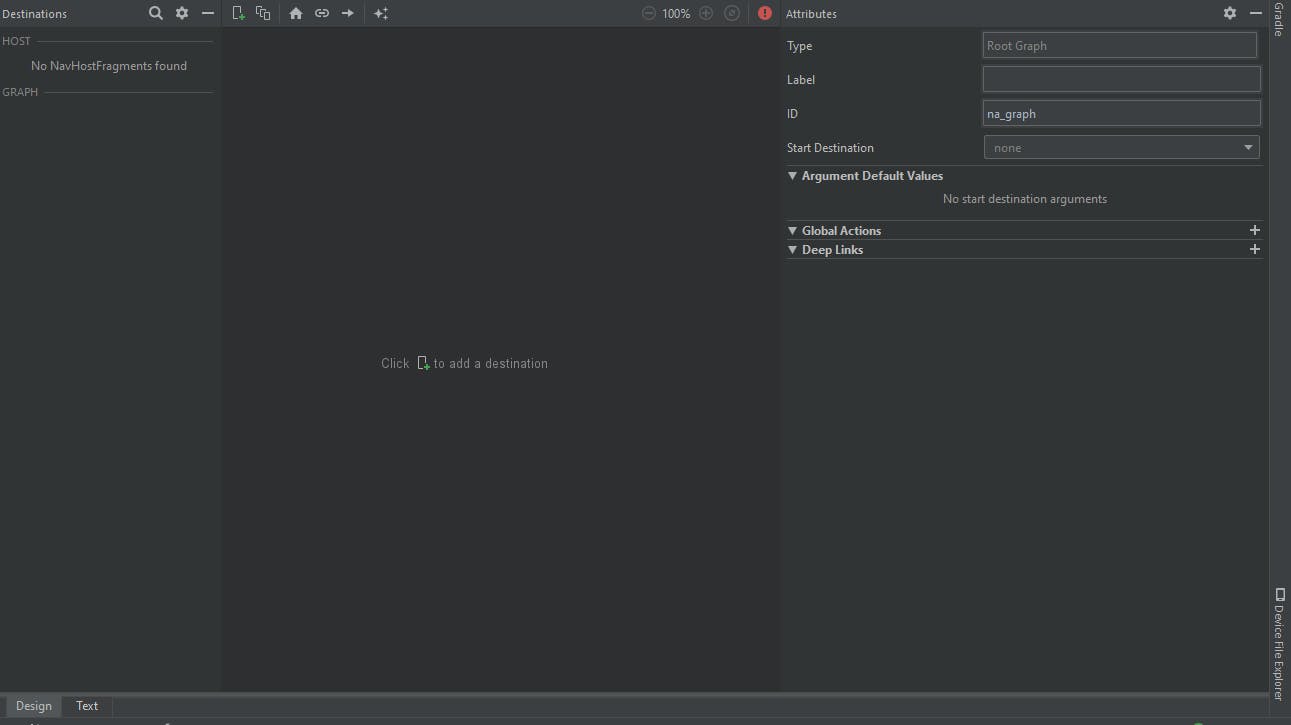
Add destinations
To add a destination click on
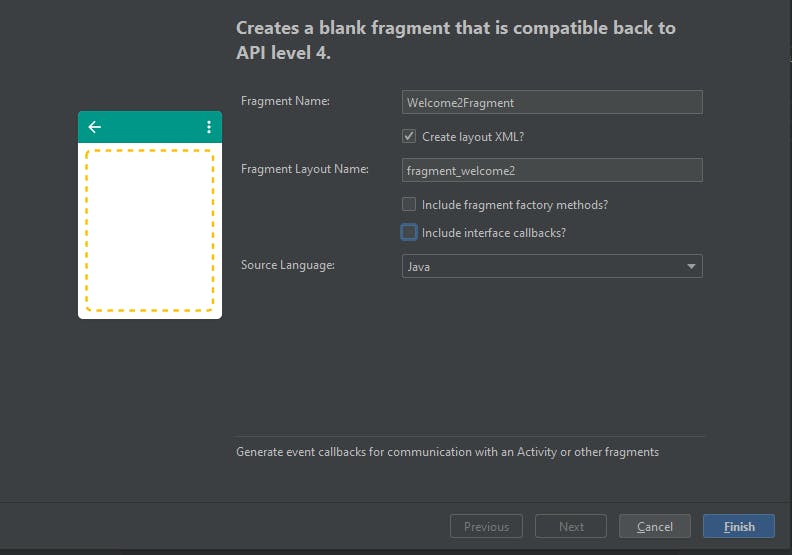
 symbol. Then select create new destination. A new fragment dialog appears as shown below.
- Enter the name of the fragment.
- Uncheck include fragment factory methods and include interface callbacks checkboxes.
- Select language. In this project I have used Java.
- Click finish.
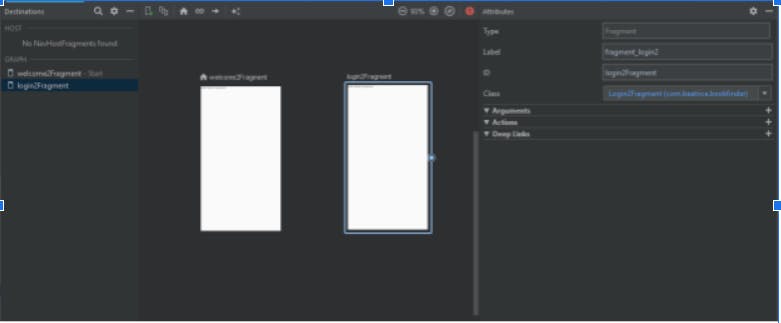
 Follow the above procedure to add more destinations. I will work with only two destinations for this project.
My navigation graph looks like below.
Follow the above procedure to add more destinations. I will work with only two destinations for this project.
My navigation graph looks like below.
Adding a Navhost to the Activity.
A Navigation host is an empty container where destinations are swapped in and out as the user navigates through your app.Navigation host must derive from NavHost. Navigation components default NavHost implemenation, NavHostFragment, handles swapping of fragments destinations.
.Navigation components are designed for apps with a single activity and multiple fragment destinations. The main activity is associated with a navigation graph that contains a NavHostFragment that is responsible for swapping the destinations. An app with multiple activities requires each of them to have its own navigation graph.
Adding a NavHostFragment via XML
To add NavHostFragment to an activity add a fragment to the activity_welcome.xml file as shown below.
  <?xml version="1.0" encoding="utf-8"?>
<androidx.constraintlayout.widget.ConstraintLayout xmlns:android="http://schemas.android.com/apk/res/android"
    xmlns:app="http://schemas.android.com/apk/res-auto"
    xmlns:tools="http://schemas.android.com/tools"
    android:layout_width="match_parent"
    android:layout_height="match_parent"
    tools:context=".WelcomeActivity">

    <fragment
        android:id="@+id/fragment_container"
        android:layout_width="match_parent"
        android:layout_height="0dp"
        android:name="androidx.navigation.fragment.NavHostFragment"
        app:defaultNavHost="true"
        app:navGraph="@navigation/nav_graph"
        app:layout_constraintBottom_toBottomOf="parent"
        app:layout_constraintEnd_toEndOf="parent"
        app:layout_constraintStart_toStartOf="parent"
        app:layout_constraintTop_toTopOf="parent" />
</androidx.constraintlayout.widget.ConstraintLayout>
Note the following attributes of fragment
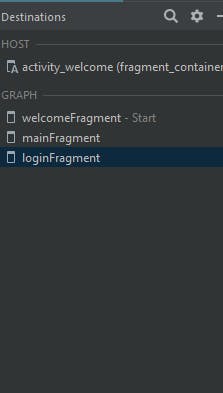
The android:name contains the class name of Navhost implementation.
The app:navGraph associate the NavHostFragment with the navigation graph that was created in the res/navigation folder
The app:defaultNavHost=”true” ensures that your NavHostFragment intercepts the system back button
There should be only one defaultNavHost to adhere to fixed start destination principle.
When you look at your navigation editor now the Host is set as shown in the figure below.
Adding actions to the navigation graph
The fragments are currently empty. I’ll open the fragments and add views. We will also add an action to connect the destinations.
- In the Design tab, hover over the right side of the destination that you want users to navigate from. A circle appears over the right side of the destination as shown in figure below.

- Click and drag your cursor over the destination you want users to navigate to, and release. The resulting line between the two destinations represents an action, as shown in the figure below.
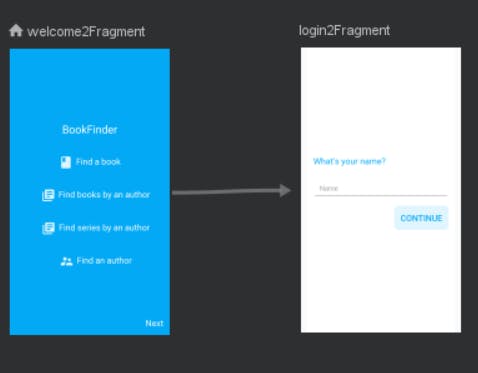
- Click on the arrow to highlight it . The attribute window opens. It contains the following: Type: action ID: <id of the action> Destination: Contains the id of the destination fragment or activity. Click on the text tab to toggle the xml view.
Navigate to the destination.
Click Listener methods of Navigation components will generate onClickListener method that will navigate to a destination.
Navigation.createNavigationOnclickListener(action)
Action is the ID of the action created in the navigation graph.
Example Java code to navigate from welcomeFragment to LoginFragment
View rootView = inflater.inflate(R.layout.fragment_welcome, container, false);
        rootView.findViewById(R.id.next_txtview).setOnClickListener(
                Navigation.createNavigateOnClickListener(R.id.action_welcomeFragment_to_loginFragment)
        );
return  rootView;
Run the app and test it to make sure it works as you desired.
I hope this article was helpful. Leave comments, ask questions. :(:(